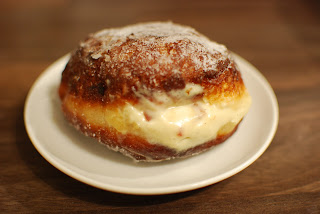
Looking back now, what prompted me then to sit up and declare ‘I shall make doughnuts this day’ (because that’s how I actually talk), I have no idea. I obviously had a yawning circular shaped chasm in my life that needed to be filled, totes Freudian. But anyway. I did it and bloody hell, what a journey it was. A whole day of mixed emotions, ok, I say mixed, it was pretty much howling anger and frustration but at the close, there was just a tiny measure of delight.
You see, I found making doughnuts to be a complete and utter fucking ballache from start to end, but the finished, aesthetically misshapen, fried sugar dusted globes, oozing bourbon custard specked through with caramelised bacon were an absolute joy to eat.
Where did I get the inspiration for bacon and bourbon custard doughnuts? I have no idea. It just came to me in a similar boss-eyed brain flash that brought you celery ice-cream (yay) served with hot Stilton fritters (errr retch). My noggin just spits out stuff, that’s how it works. Sometimes it’s ‘mazers. Sometimes it’s totally ming. There’s no way of knowing until I actually make whatever it happens to be. Thinking about it, in all honesty, there’s probably a combination of influences at work, from the BBQ flavours in the day job as a manager at Grillstock to the incredible oxtail doughnuts at Duck at Waffle.
I decided to adapt the St John doughnut recipe from Beyond Nose to Tail, theirs are generally considered to be the best example money can buy (although if you’re reading this and are Bristol based, check out Pippins doughnuts, every Friday at Corn Street market – made by a former St John pastry chef, they’re just as good, unsurprisingly).
Towards the end of the doughnut making process, when I was feeling utterly broken, covered in a combination of flour, dough and desperation with every single bare surface in the wreckage of my kitchen littered with discarded ingredients and equipment, like a far warmer, gastronomic version of Napoleon’s 1812 retreat from Moscow; salvation came.
I’d forgotten that a friend of mine was until recently a pastry chef at the St John Hotel and was just a bit more than au fait with the whole doughnut making process. No doubt observing my blood curdling, profanity laden doughnut hell via the medium of Twitter, he offered to email me some tips and addendums to the published St John recipe, based on his own professional experiences. This much-needed lifeline came too late for me friends. I will be forever mentally scarred by my delicious but ugly doughnuts sat there, silently mocking my herculean baking efforts, just by their very existence.
But this need not happen to you. I’ve added my chef friend’s observations to the recipe, so if you attempt it yourself, you’ll be better prepared than I was.
The doughnuts themselves are delicious. The bourbon flavoured custard is subtly boozy, the caramelised bacon bits, salty-sweet and you know…as porky as you’d expect. If you’re really not sure about the meat element, leave it out. I’ll forgive you. Sort of.
One final observation. Crème patissiere is the f*cking daddy. I’ve never made it before and to say I was massively impressed is something of an understatement. Holy shit, I couldn’t leave it alone. Sneaking back for sly spoonfuls, smearing it in hot cross buns, mainlining it intravenously…. perhaps not the last one…yet, but you get the idea. Consider yourselves warned and go purchase some fatty trousers now.
Bacon and Bourbon Custard Doughnuts
Makes 25
You’ll need a freestanding electric mixer with the beater attachment (like my faithful KitchenAid, Klaus Von Battenberg).
You’ll Need: -
500g strong white flour
65g caster Sugar, plus extra for coating
10g salt
15g fresh yeast
4 large eggs
Grated zest 1 lemon
155ml water
125g softened unsalted butter
Sunflower oil for deep-frying
Place all the ingredients except the butter and the oil in the bowl of the mixer. Mix on a medium speed for 6 minutes, then scrape down the sides of the bowl.
Start mixing on a medium speed again, adding the soft butter about 20g at a time until all incorporated. Keep mixing for 6-8 minutes, until the dough has come away from the sides of the bowl and looks smooth, glossy and elastic.
Place the dough in a large bowl, sprinkle the surface with flour and cover with a tea towel. Leave to rise for 2-3 hours in a warm place, until doubled in size, then knock back the dough. Cover the bowl with cling film and place in the fridge for at least 4 hours or overnight.
Cut the dough into 25 pieces and roll them into smooth balls. Place on floured baking sheets, leaving about 5cm between each one. Cover with cling film and leave to prove for 2-3 hours, depending on how warm it is; they should double in size.
Heat your deep fat fryer to 190C
With the oil at the right temperature, start frying the doughnuts in batches of 3 or 4. They will take about 2 minutes on each side. Remember to check the temperature of the oil between each batch, as the doughnuts are done; place them on kitchen paper to soak up the excess oil and then toss in caster sugar.
To fill your doughnuts, you will need a piping bag with a nozzle. Make a hole in each doughnut with a small knife and pipe in the filling, about 4 Tbs per doughnut.
Here’s the Bacon and Bourbon Crème Patissiere recipe for the filling.
Makes enough to fill 25 doughnuts (that’s handy then).
You’ll need:-
2 vanilla pods
1 litre full fat milk
12 large egg yolks
130g Caster Sugar
80g plain flour
250ml lightly whipped double cream
3-4 Tbsp Bourbon Whisky
8 rashers streaky bacon
8 Tbsp brown sugar
First, lay the bacon out on a silicon-baking sheet or foil-covered tray, sprinkling each piece with the brown sugar. Place in a 200C oven and bake for 12-16 mins. Halfway through, flip them over. When dark brown, remove from the oven and cool on a wire rack. Once cooled, chop into small pieces (remember, they have to go through a piping bag nozzle).
Next, make the crème patissiere.
Slit the vanilla pods lengthways and scrape out the seeds. Put the pods and the seeds in a saucepan with the milk and bring to the boil over a medium heat.
Meanwhile, mix the egg yolks and sugar together in a large bowl. Sift in the flour and whisk it all together. When the milk is boiling, pour it over the egg mixture, whisking all the time. Then return the mixture to the saucepan and slowly bring to the boil over a low heat, whisking occasionally.
Once it is boiling, whisk continuously for about 5 minutes, until very thick and smooth. Strain through a fine sieve into a bowl and cover the surface with cling film to prevent a skin forming. Leave to cool, then chill.
When you’re ready to fill the doughnuts, fold the whipped cream through the crème patissiere to lighten it and, stir through the chopped caramelised bacon and the Bourbon whisky.
Now, before you dive in and start madly churning out doughnuts here’s what my friend Sam, ex St John Hotel pastry chef has to add to the recipe and doughnut making in general…
Firstly, I think you can drop 5ml of water from the mix. This is probably one of those little things that creep in when you scale up/down recipes.
Second, you need to really mix it well before the butter goes in. The instructions in the book are misleading I think. I used to do it for 10mins on medium speed until the dough is really glossy and comes away from the sides of the bowl. At the start that seems unlikely but then it works and looks like proper dough! Once at this stage, add the butter, which needs to be properly soft. I add it a bit at a time, mixing slowly until it's all incorporated, then turn up the speed and give it a 3-minute blast, to really make sure the butter is properly combined.
Thirdly, we used to just stick the dough straight in the fridge, as leaving it out is going to make it overprove before it's chilled enough for shaping. When you refrigerate fermenting dough there's a degree of inertia - dough takes a while to chill, and it's fermenting all the time, so there is a tendency for it to overprove even in the fridge. I think if you leave the dough out before fridging, then overproving is guaranteed. It'll be pretty warm from the mixer anyway. I find they are best to mix the dough in the morning, then pop in the fridge all day, then fry in the evening, but the dough is good in the fridge 3 days as long as it went straight in there from the mixer.
Shaping wise: with the dough really cold it'll be a lot easier. Oil on the hands stops it sticking, and on the scales etc. Oil some pieces of baking paper which are large enough for the amount of doughnuts you can fry in one go, say 2, then when you fry you can drop the whole paper with dough straight into the fryer instead of having to manhandle them. You can drop the paper in the oil, just keep hold of one bit so you don't burn yourself taking them out again, they need to be kind of submerged so the doughnut cooks off the paper.
When you shape, you don't need to do much, but to get them very regular you need to shape them like a bread roll, taking the edges of the piece into the middle, one at a time, each time it stretches the dough and provides shape, then roll it between your hands 'til it's smooth. Hard to explain really.
Fry at 175c, not 190. They are best within an hour, but fine for a day.
Staff fave for leftovers is one bunged in the oven to warm, then cut open with a scoop of chocolate ice cream inside... Naughty.
So there you go, hopefully with the original recipe and these doughnut shaped words of wisdom from Sam, you won't have a nervous breakdown, like I did.
Massive thanks again to Sam for taking the time to email me such useful advice.
Follow him on Twitter @samjleach
Massive thanks again to Sam for taking the time to email me such useful advice.
Follow him on Twitter @samjleach


